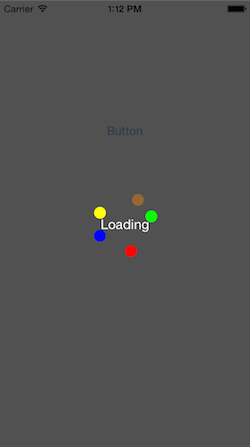
Custom loading animation for iOS
I came a cross a bunch of links for CSS Loading Animations. This one seemed rather useless but funny.
Being new to iOS and learning the Cocoa-touch framework(s) I wanted to challenge my self to make a similar loading animation on iOS :)
I solved this by setting up a path for each object to move along with UIBezierPath and CAKeyframeAnimation.
First. Create a new project, a Single View Application will do. Let’s name it FancyLoadingAnimation.

Open Main.storyboard and add a button somewhere on the View. By default Xcode should also have created a ViewController as the Custom Class for the first ViewController in the Storyboard. If you click on ViewController in the dock, you can see under the Identity Inspector that the Custom Class is set to “ViewController”.

Hide the dock and right-side panel to get more space. Then ⌥ (ALT) + Click the ViewController.m file. Both the Storyboard and the ViewController.m file should now be open. ⌃ (CTRL) + Click on the button and hold ⌃ (CTRL) pressed while moving your mouse over to ViewController.m under @implementation.

This is one way to make an Action Connection in Xcode. Name is something useful like buttonPressed.
Let’s get back to this method later. Create a new file with ⌘ (CMD) + N. Choose Objective-C Class under Choose Cocoa Touch. Subclass should be UIView, name it LoadingAnimationView.
Open LoadingAnimationView.h and add two class methods.
@interface LoadingAnimationView : UIView

+ (void)showLoadingView;
+ (void)hideLoadingView;

@end
Using these class methods we will tell LoadingAnimationView to put it self on top of the view hierarchy and remove it self again. We don’t need to keep a reference to it. It will keep a reference to it self instead.
Let’s start with the init method. Here we’ll create the objects that we will animate and set the background of the view.
- (id)init
{
    self = [super init];
    if (self) {

        // Background with alpha so the view is transculent.
        self.backgroundColor = [UIColor colorWithWhite:0.2
                                                 alpha:0.85];


        // Get the size of the entire screen
        CGRect screenRect = [[UIScreen mainScreen] bounds];

        // Set the frame to be equal to the screen size
        self.frame = CGRectMake(0, 0, screenRect.size.width, screenRect.size.height);

        // Let's create a label
        UILabel *label = [[UILabel alloc] initWithFrame:CGRectMake(0, 0, CGRectGetWidth(self.bounds), 100)];
        label.center = self.center;
        label.textAlignment = NSTextAlignmentCenter;
        label.textColor=[UIColor whiteColor];
        label.text = @"Loading";
        [self addSubview:label];

        /*
        Here we will add the animations
         */

    }
    return self;
}
Let’s implement + (void)showLoadingView. Before we can do that we will make it possible to keep one static reference to this View, so we don’t need to instantiate it everything we want to show it, and being forced to keep a reference to it until we want to hide it.
+ (instancetype)privateInstance
{
    static dispatch_once_t once;
    static LoadingAnimationView *privateInstance;
    dispatch_once(&once, ^{
        privateInstance = [[self alloc] init];
    });
    return privateInstance;
}
This method will keep a static reference to our self that only will be instantiated once. Now let’s create + (void)showLoadingView.
+ (void)showLoadingView
{
    LoadingAnimationView *loadingView = [LoadingAnimationView privateInstance];

    UIWindow *keyWindow = [[UIApplication sharedApplication] keyWindow];
    [keyWindow addSubview:loadingView];
}
The *keyWindow is our Window where all the views are added to. When we do [keyWindow addSubview:loadingView], we put this View on top of the hierarchy. Let’s make a transition where the View fades in which is a less dramatic appearance.
 [UIView transitionWithView:keyWindow
                      duration:0.3
                       options:UIViewAnimationOptionTransitionCrossDissolve
                    animations:^{
                        [keyWindow addSubview:loadingView];
                    }
                    completion:^(BOOL finished) {

                    }];
Go back to ViewController.m and implement the action for when you press the button you created in the Storyboard. Remember to import “LoadingAnimationView.h”.
- (IBAction)buttonPressed:(id)sender {
    [LoadingAnimationView showLoadingView];
}
Now run the application and click the button. Try to click the button again behind the LoadingAnimationView, you can’t. This way the user can’t do anything until you are done loading or doing what needs to be done. Not an optimal solution really, I wouldn’t use it in a real app. :)
Let’s add some animations!
Create a new file, this time subclass it to NSObject. Name it AnimatedCircleUtility.
This object will have one class method, it’s long and it’s ugly.. But it saves you a lot of time - using this utility it becomes easy to add those moving circles in big numbers ;)
@interface AnimatedCircleUtility : NSObject

+ (void)addAnimatedCircleToView:(UIView *)view
                   withDiameter:(CGFloat)diameter
                         center:(CGPoint)center
                          color:(UIColor *)color
                   movingRadius:(CGFloat)radius
                      clockwise:(BOOL)clockwise
                       duration:(CGFloat)duration;

@end
Let’s implement it in the .m file.
+ (void)addAnimatedCircleToView:(UIView *)view
                   withDiameter:(CGFloat)diameter
                         center:(CGPoint)center
                          color:(UIColor *)color
                   movingRadius:(CGFloat)radius
                      clockwise:(BOOL)clockwise
                       duration:(CGFloat)duration
{

    // Let's create the circle
    UIView *circle = [[UIView alloc] initWithFrame:CGRectMake(0, 0, diameter, diameter)];
    circle.backgroundColor = color;

    // This will make it circular
    circle.layer.cornerRadius = diameter / 2;

    // Let's place it where we want it on the screen
    circle.center = center;

    // This path is where the circle will move along
    UIBezierPath *path = [[UIBezierPath alloc] init];

    // This creates a circular path
    [path addArcWithCenter:center
                    radius:radius
                startAngle:0.0
                  endAngle:M_PI * 2.0
                 clockwise:clockwise];

    // This creates the animation
    CAKeyframeAnimation *pathAnimation = [CAKeyframeAnimation animationWithKeyPath:@"position"];
    pathAnimation.calculationMode = kCAAnimationPaced;
    pathAnimation.fillMode = kCAFillModeForwards;
    pathAnimation.removedOnCompletion = NO;
    pathAnimation.repeatCount = INFINITY;
    pathAnimation.timingFunction = [CAMediaTimingFunction functionWithName:kCAMediaTimingFunctionLinear];
    pathAnimation.duration = duration;

    // Let's use the UIBezier path we created
    pathAnimation.path = path.CGPath;

    // We add the animation to the circle
    [circle.layer addAnimation:pathAnimation forKey:@"movingAnimation"];

    [view addSubview:circle];
}
Alright.. Let’s go back to LoadingAnimationView’s init. Remember to import “AnimatedCircleUtility.h”.
- (id)init
{
    self = [super init];
    if (self) {

               ...

        [AnimatedCircleUtility
            addAnimatedCircleToView:self
            withDiameter:15
            center:self.center
            color:[UIColor blueColor]
            movingRadius:35
            clockwise:YES
            duration:2.0];

        [AnimatedCircleUtility
            addAnimatedCircleToView:self
            withDiameter:15
            center:self.center
            color:[UIColor greenColor]
            movingRadius:35
            clockwise:YES
            duration:3.0];

        [AnimatedCircleUtility
            addAnimatedCircleToView:self
            withDiameter:15
            center:self.center
            color:[UIColor yellowColor]
            movingRadius:35
            clockwise:NO
            duration:2.0];

        [AnimatedCircleUtility
            addAnimatedCircleToView:self
            withDiameter:15
            center:self.center
            color:[UIColor redColor]
            movingRadius:35
            clockwise:YES
            duration:4.0];

        [AnimatedCircleUtility
            addAnimatedCircleToView:self
            withDiameter:15
            center:self.center
            color:[UIColor brownColor]
            movingRadius:35
            clockwise:NO
            duration:5.0];


    }
    return self;
}
Now run the application again… :D
Let’s implement the method for hiding it again.
+ (void)hideLoadingView
{
    LoadingAnimationView *loadingView = [LoadingAnimationView privateInstance];
    [loadingView removeFromSuperview];
}
That’s it really. A final touch to se demonstrate how you hide it. In ViewController.m.
- (IBAction)buttonPressed:(id)sender {
    [LoadingAnimationView showLoadingView];

    dispatch_time_t delay = dispatch_time(DISPATCH_TIME_NOW, NSEC_PER_SEC * 2);
    dispatch_after(delay, dispatch_get_main_queue(), ^(void){
        [LoadingAnimationView hideLoadingView];
    });
}
If you noticed, the UIView’s transitionWithView:duration:options:animations:completion: method will freeze all other animations until the transition is done. I haven’t figured out a solution to this problem. Still learning… :)